Ever have a great idea for a quick party, but don’t have the time to go through the hassle of party planning and sending invitations? By creating a Facebook Event, throwing a quick party has never been easier! With just a few clicks of a button, you are able to create an event invitation and send it to all of your friends.
Within minutes, friends can respond with an Attending, Maybe Attending, or Not Attending. They can even write messages on your Event’s Facebook Wall — “I’m bringing the chips!” Party planning has never been faster!

To begin, login to Facebook and click “EVENTS” in the left side column. This will bring you to the Events page where you can all of your upcoming events and even your friends events. Click the “+ CREATE AN EVENT” button at the top of the Events page.
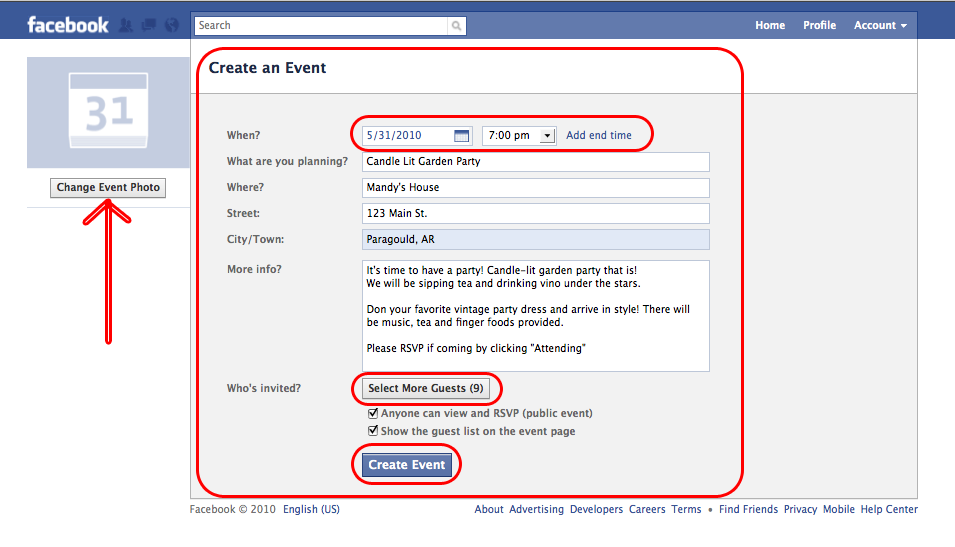
Above you see the party I am planning is a Candle-Lit Garden party at My house. What this means:
- WHEN – This is the date and time of your party. Click “Add End Time” if there is an end time. This party will go on until “?” So I just left that out.
- WHAT ARE YOU PLANNING – This is going to be the NAME of your event. Name it something descriptive enough that your friends will instantly understand what you are asking.
- WHERE – This is the place you are holding your event. For my event, it’s my house. Examples would be “City Community Center,” “Hope’s Chapel,” “Chuck-E-Cheese”… you get the idea.
- STREET/CITY/TOWN – These are all optional.. I put my info (it’s not real info, by the way) in because not all of my friends know where my house is. If you were having your party at the Community Center or a well-known place you could leave this out.
- MORE INFO? – Write a description for your event. Be sure to specify if your guests need to do or bring anything with them. For my garden party, we are going to dress up, so I included that in the More Info. This would be a great place to suggest bringing food or drinks!
- WHO’S INVITED – By clicking the “Select Guests” button you can browse through your list of contacts and click them (turns the icon blue) to select and invite.
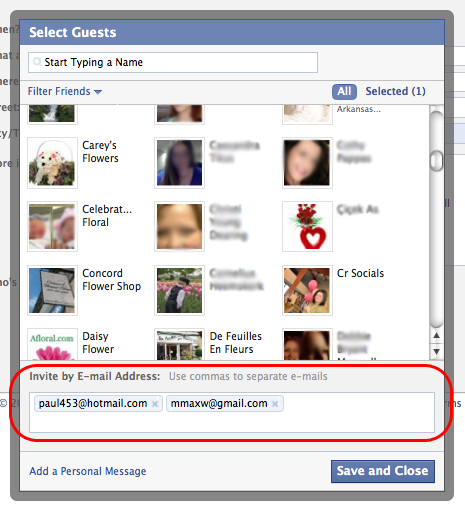
By clicking “INVITE BY EMAIL” under your contacts, you can invite people who aren’t on Facebook.
 6. ANYONE CAN VIEW AND RSVP – This is the box you UNCHECK if you want this to be an invite only party. If you leave it checked, anyone is able to RSVP.. which is great for workshops or concerts, but not for small tea parties.
7. SHOW THE GUEST LIST ON THE EVENT PAGE – This removes the guest list from the events page… pretty self explanatory. 🙂

This is what you’re new Facebook Event will look like! You see the name at the very top left, and under is your event’s information. There’s even a handy “view map” option if you’ve entered an address.
The Description I put explains what I am planning. You can add as much information as you want.
The Confirmed Guests section is for people who are definitely coming to your event. This is where your friends will be listed only if they clicked “Attending.”
Your Wall is below the Description. This is where your guests can comment on your event. Great for impromptu parties, “I’m bringing the chips!” but also used for “Sorry, I’ll be out of town that weekend.” You can also share photos, videos and links here. If you’re having a themed party, post pictures of costumes or decorations so your guests will be aware of what they’re getting themselves into, haha!
 Below your Event’s main photo at the top right is a list of links.
- Invite People To Come – To invite more guests
- Promote Event with an Ad – This would be more for big events, workshops, conferences… The ad does cost, but can be great, targeted exposure for your event!
- Edit Guest List – to edit your list.
- Cancel this Event – to cancel your event.
- Edit Event – This is where you can edit all of the event information you entered earlier.
- Message Guests – A way to send a message to everyone attending your party. Great for letting your guests know of any changes to your event.. like a time or location change.
- Print Guests List – Takes you to a printer-friendly page for optimal printing.
Party Invitation Etiquette
Facebook Events makes it easier than ever to hold an impromptu party, but for big parties and events, it is still good etiquette to mail party invitations. Custom party invitations come in so many styles and varieties, who could pass up matching invitations to their party theme?
Many people opt for adding a shortened URL of their Facebook Event Page to their party invitations and suggests guests RSVP from Facebook. Having your guests RSVP in Facebook makes it easier for you to manage your guests list, but also gives you the ability to instantly send your guests updates to any changes you might have. (GREAT for weddings too!)
So next time you’re planning a big event, wedding or party… don’t forget to use one of the most helpful party planning tools for e-invitations out there — Facebook. (and don’t forget Wedding and Party Network for all of your other party planning needs!)


Leave a Reply